

Table of Contents
Introduction:
Forget a WiFi network on MacBook and master the art of Disable Auto-Join WiFi on Your MacBook with our specialists. Break free from auto-join struggles as you unlock the hidden potential of your MacBook’s perfect internet connection. Discover the secrets to regain control over your WiFi connections – get started now! Forget Wi-Fi on MacBook for improved connectivity and security.
Why forget Wi-Fi on MacBook?
Sometimes, you might need to forget a Wi-Fi network on your MacBook. Whether it’s to fix connection issues, update security, or just tidy up your saved networks, it’s a handy skill to have. Knowing when and why to forget a Wi-Fi network is the key to managing your networks efficiently. So, don’t hesitate to forget Wi-Fi on MacBook when needed – it’s all about keeping things smooth and secure.
Step-by-Step Guide: Forgetting Wi-Fi on MacBook
Let’s dive into the practical aspect. Here’s a step-by-step guide on how to forget a WiFi network on your MacBook:
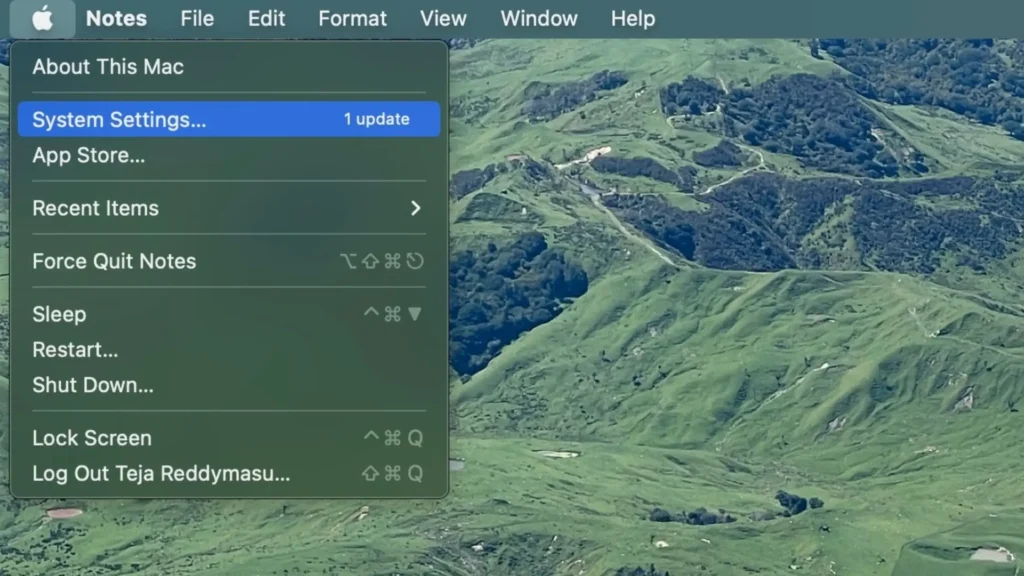
Open System Preferences
- Go to the Apple menu and open “System Settings.”
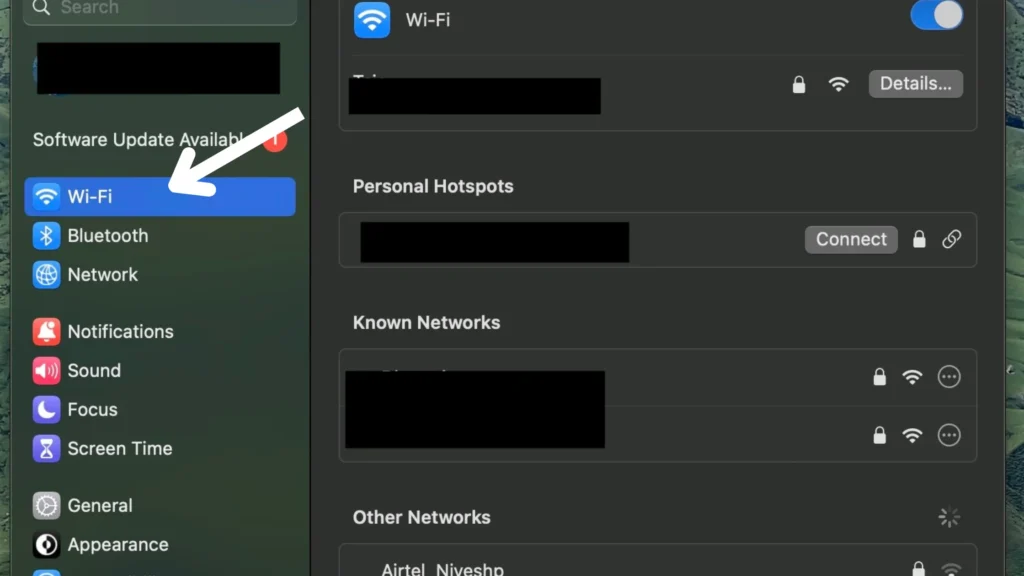
Select Wi-Fi
- In the left sidebar, choose “Wi-Fi” to display available networks.
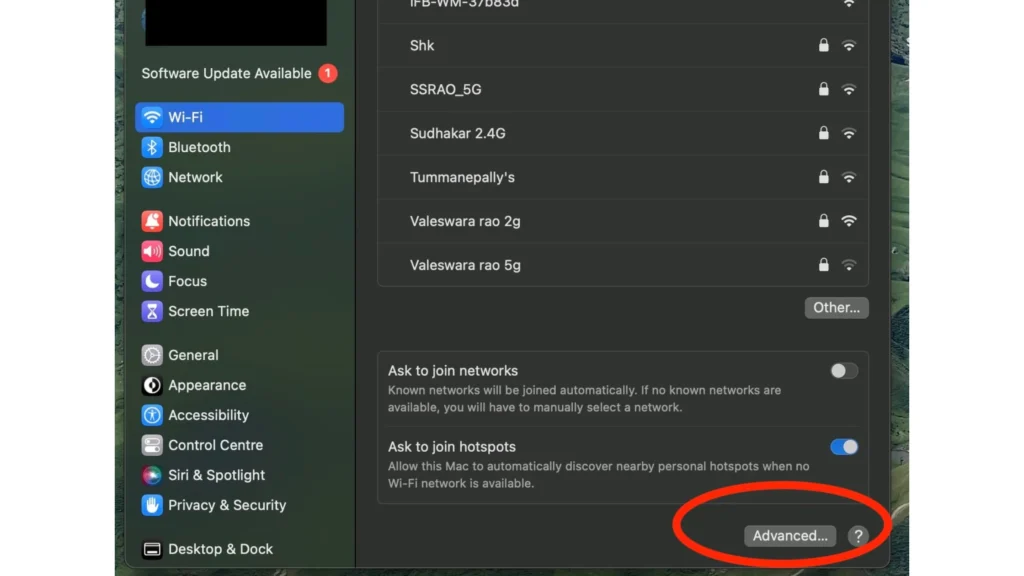
Advanced Settings
- Scroll down and click on the “Advanced” button to access advanced Wi-Fi settings.
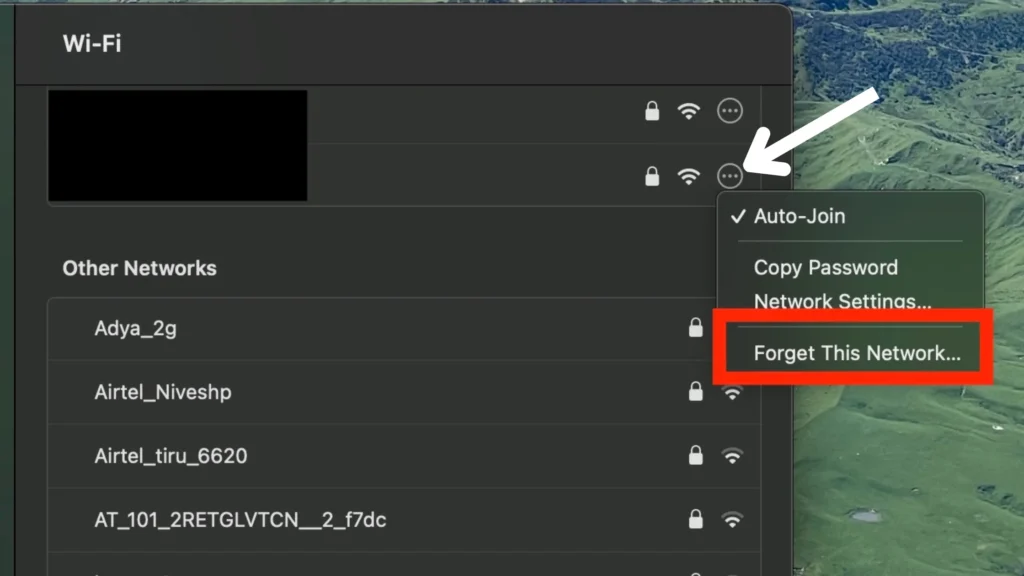
Select the network you want to forget.
- Under the “Wi-Fi” tab, select the network you want to forget from the list.
Forget Network
- Click the “Forget” button to remove the selected Wi-Fi network.
Confirm
- Confirm your action when prompted.
Apply Changes
- Click “OK” to apply the changes.
FAQs on Forgetting Wi-Fi on MacBook
Q. How Often Should I Forget Wi-Fi Networks?
A. Regularly, especially in dynamic environments where network availability changes frequently.
Q. Will Forgetting a Network Affect Other Devices Connected?
A. No, forgetting a network on your MacBook only affects your device’s connection.
Q. Can I Recover a Forgotten Wi-Fi Password?
A. Unfortunately, once forgotten, you’ll need to re-enter the Wi-Fi password the next time you connect.
Q. Are There Risks Involved in Regularly Forgetting Wi-Fi Networks?
A. No, in fact, regularly forgetting networks enhances security by minimizing the risk of unauthorized access.
Q. What Should I Do If I Forget a Network by Mistake?
A. Simply re-enter the Wi-Fi password when prompted. It’s a quick fix.
Conclusion
As we close the chapter on forgetting Wi-Fi networks, let’s recap the key insights. Think of it like tidying up your digital space—a bit of effort in managing your Wi-Fi connections can make a real difference. So, don’t hesitate to forget Wi-Fi on MacBook when necessary; it’s like giving your network a little spring cleaning, ensuring a smoother and more efficient connection experience for you.
Unlock Control: Disable Auto-Join WiFi on MacBook Easily!
Understanding Auto-Join on MacBook:
In our ever-evolving tech world, the quest for convenience often brings new features to our devices. Enter Auto Join on MacBook – a nifty tool designed to simplify Wi-Fi connections. However, many users discover it brings more trouble than ease. This guide takes you through the ins and outs of Auto Join, highlighting its quirks, and, most crucially, walks you through how to Disable Auto-Join WiFi on MacBook. Bid farewell to unnecessary hassles and welcome a smoother user experience by mastering how to Disable Auto-Join WiFi on MacBook. Your stress-free connection awaits
Step-by-Step Guide to Turn Off Auto Join:
If you’ve experienced the downsides of Auto Join and want more control over your network connections, turning it off is a simple process. Follow these steps:
- Go to System Settings: Open the Apple menu and click on “System Settings.”
- Choose Wi-Fi: On the left sidebar, select the “Wi-Fi” option.
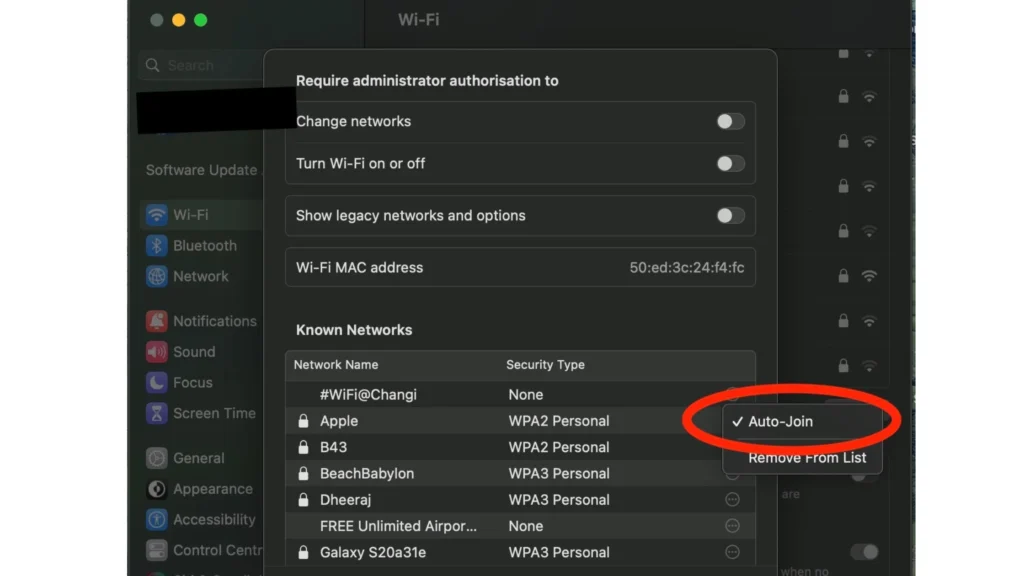
- Advanced Settings: Click on the “Advanced” button in the lower right corner.
- Preferred Networks: A list of preferred networks will appear. Select the network you want to disable auto-join for.
- Uncheck “Auto-Join”: Within the network’s details, uncheck the box next to “Auto-Join.”
- Save Changes: Click “OK” to save the changes, and then click “Apply” in the Network window.
Benefits of Disabling Auto-Join:
Disabling Auto Join offers several advantages, including:
- Improved Control: You decide when and where to connect.
- Enhanced Privacy: Avoid connecting to unsecured or unwanted networks.
Frequently Asked Questions about Auto Join
Q. Can I disable auto-join for specific networks only?
A. Yes, you can. Follow the steps mentioned in the article and uncheck “Auto-Join” for individual networks.
Q. Will turning off auto-join affect other network settings?
A. No, turning off Auto Join only prevents automatic connections. You can still manually connect to networks as needed.
Q. What happens if I forget a network after disabling auto-join?
A. Forgetting a network removes it from the list of preferred networks. You’ll need to manually reconnect if you want to use that network again.
Q. Does disabling Auto Join improve battery life?
A. Even though it might not make a huge difference to how long your battery lasts, not connecting to the internet when you don’t need to can help your phone use energy more efficiently.
Q. Can I re-enable auto-join if needed?
A. Certainly. Follow the same steps in the article and check the “Auto-Join” box for the desired network.
Conclusion:
To sum up, when you manage your MacBook’s network connections and choose to Disable Auto-Join WiFi on MacBook, you set the stage for a smoother and safer experience. Following these straightforward guidelines and incorporating additional network management tips empowers users to tailor their connection settings. Remember, your technology should adapt to your lifestyle, not the other way around. So, make your MacBook work for you by saying no to Auto-Join hassles and embracing a personalized, seamless tech experience.
You May also Like:
- Revitalize: 7 Power Fixes for ‘MacBook Won’t Turn On After Update
- 3 Ways to Effortlessly Delete All Emails from One Sender in Gmail
- Asus vs. HP Laptops 2024: Decoding the Best Choice for You
Mobile Related:
- 11 World’s Most Expensive Mobile Phones: A Luxurious Affair
- Empower Photos: ‘Why is My Camera Blurry?’ – 5 Fixes Illuminate
- Why Does My Phone Randomly Vibrate? 2024 Causes and Fixes
